
One of the things I love about workshops is the give and take of sharing. I may be there to “teach” but I always walk away having learned something myself. This past month at Dream Come True Farm was no different. This time I went home with inspiration and courage to cut my woven fabric!
The first workshop day I was inspired by a vest my student Pam was wearing. I’d seen Pam’s projects on Ravelry and was thrilled to get to touch one of her beautiful garments. As she explained how she constructed the vest I was inspired by her calm description of cutting the fabric. “I just stitched back and forth before I cut a few times” she said. I asked.. “Didn’t you use seambinding on each side?” “Nope” she replied, “just stitched. It’s just cloth….” Those words rang clearly in my head as I went to sleep dreaming of my woven yardage…
The next day Leslie arrived wearing the most beautiful jacket and with an amazing poncho. Both she’d woven and constructed at SAORI Worcester with the garment master Mihoko. Pam, from the day before, is also a student of Mihoko and I recognized her teaching in Leslie’s ease and calm explanation of cutting her garment. “It’s just cloth” she said.. and at that point I knew I was going to cut into my fabric I had stashed as soon as I got home.
When I got home, I pulled out my SAORI pattern books and cloth and started figuring out what I was going to make with my yardage. I knew I wanted to make the jacket that Leslie had on with my lightweight cotton yardage. I thought a vest would be perfect for my silk yardage and I found a perfect little short vest for my Minnesota yardage. I took some deep breaths and started with the yardage I wove in Minnesota at SAORIFUN Studio.
For this vest I cut 3 pieces from my long piece (and I still have a piece leftover!)
The second vest I made was super simple! Just one cut of fabric and then cutting 2 slits for armholes!! The silk drape is amazing!
At this point I was feeling far more confident in cutting my yardage and I was ready to cut into my favorite fabric to date- the cotton warp I’d woven with wool, silk and other specials- like really cool reflective yarn!. I kept repeating in my head.. “it’s just cloth and more cloth can be woven….”
I am SO happy with the finished garment! I never get to keep anything, but this one is ALL MINE!! I will make another one for sale, but this one I claim!!
Here are some things I’ve learned in this round of cutting and garment construction-
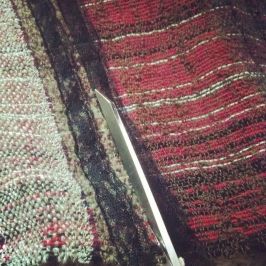
- GOOD SCISSORS ARE KEY!!!! no really.. sharp scissors that have never seen a slice of paper are necessary for an even cut. I keep these scissors next to my loom so they don’t get mixed up with “regular” scissors. I don’t feel the need for pinking shears (see next tip) and I feel like pinking shears disturb the fabric more than regular scissors.
- Sew before you cut!! Before you cut, sew on either side of your intended cut line. This will help the fabric from unraveling and removes the need for the pinking shears.
- Seambinding tape. If the seam is going to pull (like at armholes, or at a seam of 2 pieces that will get more pull) I will sew seambinding tape on either side of the cut, or a cross the seam. This takes stress off the stitches and the fabric.
- Measure 5 times before you cut anything. This is also a serious one. With handwoven fabric you don’t have much extra, and wasting is heartbreaking- so make sure you’ve measured your fabric and know where you need to cut.
- Find the “perfect” pattern. This one is hard. We’re always worried that as soon as we cut there will be a “better” pattern that comes along.. but remember, you can always weave more yardage! So once you find the pattern that’s perfect for your fabric stop looking for another one. Remember to consider drape when you are picking out your pattern. A drapy vest pattern isn’t going to give you the same effect with a stiff fabric.
- Muslin is your friend! If you are not sure about a pattern make a mock up in muslin! this will help you tweak the exact particulars of your design- where you want the armholes.. how you want the neckline. Remember to consider drape- your fabric will often drape differently than the muslin. Don’t forget to account for that in your design.
- If you have a garment you really like, you can make a pattern for it by tracing it onto muslin. Remember to add for your seams and account for the drape of your woven fabric if it’s different from the garment fabric you are replicating.
- A dressform is really helpful- though if it isn’t in your size it isn’t *that* helpful! Try to pad your dressform as close to your size as possible. even a couple centimeters will throw off your sizing when cutting armholes. When you are constructing garments having a friend to help you pin to your shape is key if you don’t have a dressform your size.
- “Finish” your fabric before you cut. A wet finish will allow the fibers to bloom and set in the cloth. Pressing the fabric with a hot iron while pulling it into shape will set the cloth shape. Different fibers will react differently to the finishing process. How much agitation is used also will affect the final drape of the cloth. It is important to finish the fabric before your garment construction because of how the shape and drape of the cloth can change after finishing.
- If your fabric isn’t large enough, think about stitching pieces together. This brings depth and dimension into your design.
Remember- It’s just cloth!! You can always weave more!! Be empowered in your cutting!! Do you have any tips on cutting handwoven cloth? I’d love to hear them in the comments!!